How to Grow and Care for Camellia
Mastering the art of camellia care can transform your garden into a vibrant showcase of thriving blooms. Known for their stunning flowers and glossy evergreen leaves, camellias are a favorite among gardeners who appreciate their elegance and resilience. However, to achieve and maintain their full potential, these beautiful plants require specific attention and care. In this guide, we will delve into essential tips for growing and nurturing camellias, from selecting the right location and soil to proper watering, pruning, and pest management techniques. Join us as we unlock the secrets to cultivating breathtaking camellias that will enhance your garden’s beauty year-round.
Understanding Your Camellia
Choosing the Right Variety
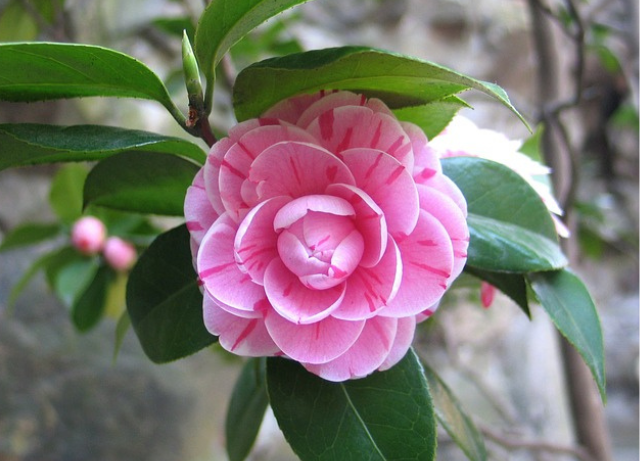
When selecting a camellia variety, consider your local climate and the specific characteristics you desire. There are two main types: Camellia japonica and Camellia sasanqua. Camellia japonica is known for its larger flowers and blooms from winter to spring, making it ideal for cooler regions. On the other hand, Camellia sasanqua has smaller flowers but a longer blooming period from fall to early winter, and it can tolerate more sun and heat. Evaluate your garden’s conditions, such as light availability and soil type, as different varieties may thrive better in specific environments. Additionally, consider the plant’s mature size to ensure it fits well within your garden layout. By choosing the right variety, you set the foundation for a healthy and flourishing camellia that will enhance your garden’s aesthetic appeal.
Ideal Growing Conditions
To ensure your camellia thrives, it’s crucial to provide optimal growing conditions. Camellias prefer well-draining, acidic soil with a pH between 5.5 and 6.5. Plant them in a location with partial shade, as they can suffer from leaf scorch if exposed to full sun, especially in hot climates. However, in cooler regions, they can tolerate more sunlight. Ensure the planting site is sheltered from strong winds, which can damage the delicate flowers and foliage. Consistent moisture is essential, but avoid waterlogged soil to prevent root rot. Applying mulch around the base can help conserve moisture and stabilize soil temperature. By mimicking their natural habitat, you can create an environment where your camellias will flourish, rewarding you with their stunning blooms and lush foliage.
Soil Preparation Tips
Proper soil preparation is vital for the healthy growth of camellias. Start by testing your soil’s pH and adjust it to fall within the ideal range of 5.5 to 6.5. If the soil is too alkaline, incorporate sulfur or aluminum sulfate to lower the pH. For enhanced drainage and aeration, amend the soil with organic matter such as compost or well-rotted manure. These amendments enhance soil structure while supplying essential nutrients. It’s best to steer clear of heavy clay soils, as they retain excessive moisture and can cause root rot. Raised beds or planting on a slight mound can be beneficial in poorly drained areas. Before planting, ensure the soil is loose and crumbly to facilitate root penetration. By taking these measures, you create a nurturing environment that promotes robust root development and overall plant health.”
Essential Camellia Care
Watering Best Practices
Consistent and appropriate watering is crucial for camellia health. Camellias prefer a balanced moisture level, avoiding both drought stress and waterlogged conditions. Water your plants thoroughly once or twice a week, letting the soil dry out slightly between waterings. This promotes deep root growth and helps prevent root rot. Use a soaker hose or drip irrigation system to deliver water directly to the root zone, minimizing leaf wetness and the potential for fungal diseases. During the growing season, increase watering to support new growth and flower development. Conversely, reduce watering during the dormant period in winter. Mulching with organic materials like pine bark or straw can help retain soil moisture and regulate temperature. By following these best practices, you ensure your camellias receive the right amount of water, promoting lush foliage and abundant blooms.
Pruning for Healthy Growth
Pruning is essential to maintain the health and shape of your camellia. The best time to prune is right after blooming, typically in late winter to early spring, to avoid cutting off the next season’s buds. Begin by pruning away dead, diseased, or damaged branches to enhance the plant’s health. Additionally, thins out dense areas to boost air circulation, crucial for preventing fungal infections. When shaping the plant, make clean cuts just above a leaf node or bud to promote new growth. Remove any suckers or weak growth from the base of the plant to focus energy on stronger branches. If your camellia has grown too large, you can perform more extensive pruning, but do so gradually over a few years to avoid stressing the plant. Regular pruning encourages robust growth, enhances flowering, and keeps your camellia looking its best.
Fertilizing for Vibrant Blooms
Fertilizing your camellia properly is crucial for vibrant blooms and lush foliage. Begin in early spring when new growth appears, using a balanced, slow-release fertilizer designed for acid-loving plants, such as 10-10-10 or 12-4-8 N-P-K ratios. Apply evenly around the plant base, following package instructions. Avoid over-fertilizing to prevent excessive leaf growth that may diminish flowering. Apply every 6 to 8 weeks during the growing season, halting in late summer to avoid frost damage to new growth. Incorporating organic materials like compost or well-rotted manure enriches the soil with essential nutrients. By adhering to these fertilizing practices, you’ll support healthy growth and abundant, vibrant blooms in your camellias.

